
Current use of PHP, a scripting language running on the server side as much. Therefore need to install PHP with the following steps.
1. Install PHP language
PHP installation to support Extension. For other application usage. Like MySQL, Apxs2, gettext, FTP Mbstring, OpenSSL Xml etc. By typing the command.
sudo apt-get install libapache2-mod-php5 php5 php5-common php5-curl php5-dev php5-gd php5-idn php-pear php5-imagick php5-imap php5-mcrypt php5-memcache php5-mhash php5-mysql php5-pspell php5-recode php5-snmp php5-sqlite php5-tidy php5-xmlrpc php5-xsl

Check version by typing the command.
php -v
or
dpkg --list php5

2. Config File php.ini
Edit php.ini file to support language And create a directory using the command.
sudo nano /etc/php5/apache2/php.ini

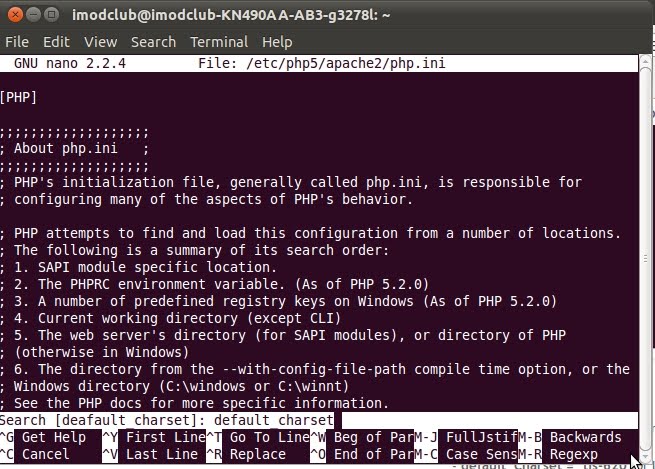
And Find the topic these and editing.
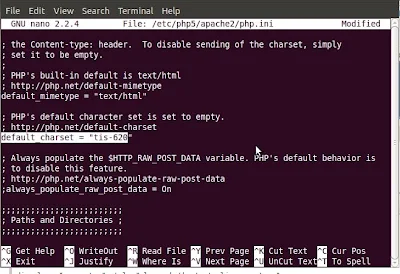
- default_Charset = "tis-620" or Language for you. press Ctrl+ W and text default_Charset. And remove the marks semicolon.

before editing

after editing
- upload_tmp_dir = "/tmp/upload" Directory for the file HTTP upload. press Ctrl+ W and text upload_tmp_dir. And remove the marks semicolon.
Before editing.

After editing.

- session.save_path = "/tmp/session" Directory for data session save. press Ctrl+ W and text session.save_path. And remove the marks semicolon.
Before editing

After editing

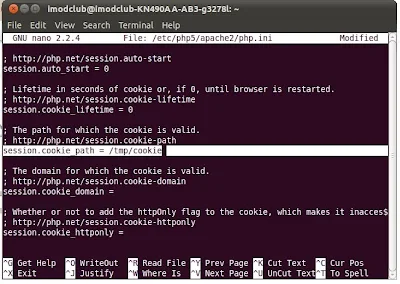
- session.cookie_path = "/tmp/cookie" Directory for data session save. press Ctrl+ W and text session.save_path. And remove the marks semicolon.
Before editing

After editng
Done to save the file. press key Ctrl+X and press key Y .
3. The next step. Create directory upload, session and cookie Stored in the directory /temp by typing the command.
sudo mkdir /tmp/upload
sudo mkdir /tmp/session
sudo mkdir /tmp/cookie
and set permission.
sudo chmod 777 /tmp/upload
sudo chmod 777 /tmp/session
sudo chmod 777 /tmp/cookie
4. Activation PHP
- To open the module using the apache by typing the command.
a2enmod php5
and restart apache by command.
/etc/init.d/apache2 restart or /etc/init.d/apache2 force-reload
5.Test script PHP.
- Write a php file to test and save the in the directory /var /www with the command nano. or other editor.
sudo nano /var/www/test.php

and type the text.
<?php
phpinfo(); //show all PHP Information
?>

Done to save the file. press key Ctrl+X and press key Y .
The client machine and then open the browser, type the following URL http://192.168.1.1/test.php. (192.168.1.1 or IP Address server). Contains information on the PHP.
Try writing a simple script to test.
sudo nano /var/www/hello.php
<html>
<head>
<title> Test PHP Script </title>
</head>
<body>
<?php
echo "Hello World";
?>
</body>
</html>
Done to save the file. press key Ctrl+X and press key Y .
test URL http://192.168.1.1/hello.php
Display show message "Hello World"
finish
Next page on click : Use phpMyAdmin
Reverse page on click : How to Install Apache for Ubuntu 10.10
1. Install PHP language
PHP installation to support Extension. For other application usage. Like MySQL, Apxs2, gettext, FTP Mbstring, OpenSSL Xml etc. By typing the command.
sudo apt-get install libapache2-mod-php5 php5 php5-common php5-curl php5-dev php5-gd php5-idn php-pear php5-imagick php5-imap php5-mcrypt php5-memcache php5-mhash php5-mysql php5-pspell php5-recode php5-snmp php5-sqlite php5-tidy php5-xmlrpc php5-xsl
Check version by typing the command.
php -v
or
dpkg --list php5

2. Config File php.ini
Edit php.ini file to support language And create a directory using the command.
sudo nano /etc/php5/apache2/php.ini

And Find the topic these and editing.
- default_Charset = "tis-620" or Language for you. press Ctrl+ W and text default_Charset. And remove the marks semicolon.
before editing

after editing

- upload_tmp_dir = "/tmp/upload" Directory for the file HTTP upload. press Ctrl+ W and text upload_tmp_dir. And remove the marks semicolon.
Before editing.

After editing.

- session.save_path = "/tmp/session" Directory for data session save. press Ctrl+ W and text session.save_path. And remove the marks semicolon.
Before editing

After editing

- session.cookie_path = "/tmp/cookie" Directory for data session save. press Ctrl+ W and text session.save_path. And remove the marks semicolon.
Before editing

After editng

Done to save the file. press key Ctrl+X and press key Y .
3. The next step. Create directory upload, session and cookie Stored in the directory /temp by typing the command.
sudo mkdir /tmp/upload
sudo mkdir /tmp/session
sudo mkdir /tmp/cookie
and set permission.
sudo chmod 777 /tmp/upload
sudo chmod 777 /tmp/session
sudo chmod 777 /tmp/cookie
4. Activation PHP
- To open the module using the apache by typing the command.
a2enmod php5
and restart apache by command.
/etc/init.d/apache2 restart or /etc/init.d/apache2 force-reload
5.Test script PHP.
- Write a php file to test and save the in the directory /var /www with the command nano. or other editor.
sudo nano /var/www/test.php

and type the text.
<?php
phpinfo(); //show all PHP Information
?>

Done to save the file. press key Ctrl+X and press key Y .
The client machine and then open the browser, type the following URL http://192.168.1.1/test.php. (192.168.1.1 or IP Address server). Contains information on the PHP.
Try writing a simple script to test.
sudo nano /var/www/hello.php
<html>
<head>
<title> Test PHP Script </title>
</head>
<body>
<?php
echo "Hello World";
?>
</body>
</html>
Done to save the file. press key Ctrl+X and press key Y .
test URL http://192.168.1.1/hello.php
Display show message "Hello World"
finish
Next page on click : Use phpMyAdmin
Reverse page on click : How to Install Apache for Ubuntu 10.10
ความคิดเห็น