
How to install Ubuntu server 10.10
1. How to install ubuntu server 10.10 you must be connected to the internet for convenience update package for the following
2. Server on and insert CD ubuntu linux Server 10.10 on CD-ROM drive and Boot from CD. Display Logo and Language install


3. Select Install Ubuntu Server.
4. Select Language again.


5. Select the check keyboard. you select "No" and select format keyboard USA for convenience.


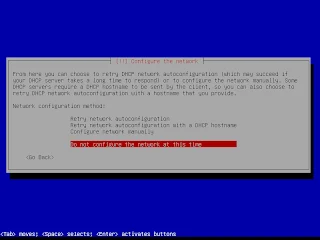
6. Configuration Network. If LAN connect Router Automatic.

If no DHCP Server or Network not connected to LAN as show. you select "Continue".

Select "Do not configure the network at this time".
7. Server your Host name. Enter you Host name.

8. This page is divided into partition management. Without the knowledge is recommended select Guided - use entire disk and setup LVM

9. Select Disk on Ubuntu Server

10. Confirm Disk Install.

11. This page asks. How many GB Harddisk space to put the finish on select Continue, then Enter.

12.This page is a detailed description of the LVM Partition that divided us and ask us how to write them? Disks, select Yes, then Enter.

13. Ubuntu will install the first part of the system, wait.

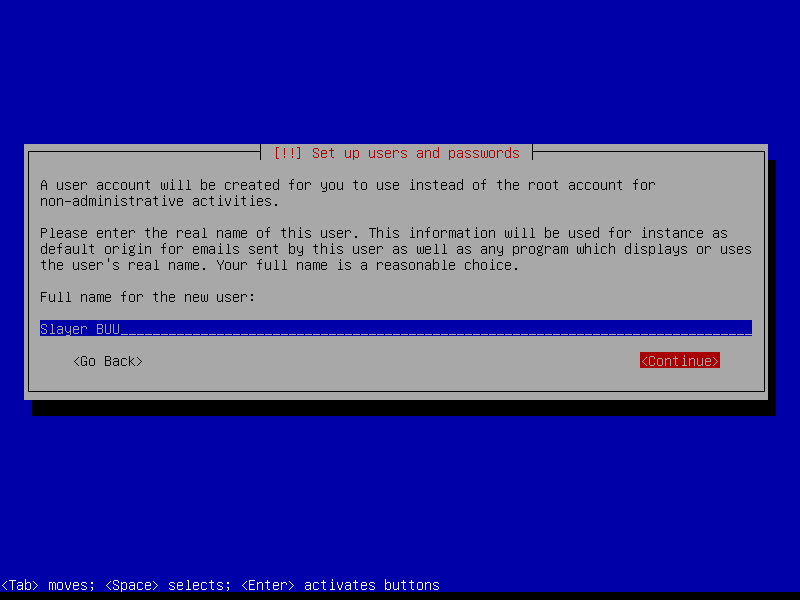
14. Admin User Setup Machine. This page, enter the full name of the administrator machine.

15. On this page, enter the username used to log input as you like and then select Continue and complete Enter.

16. This page, enter the password login enter as you like but I can remember. Finished, select Continue and then Enter.

17.Confirm Password. ter password again completed offline and then select Continue, then Enter.

18. Ubuntu on this page to ask us what we want to create a home directory or not. Advisable Yes, Enter.

19. Ubuntu will install the system on this page takes quite long.

20. This page asks. We want ubuntu to update itself or not.

21. This page will ask if we want to install anything to add based Server.

22. Ubuntu on this page, we will ask whether or not to install GRUB, choose Yes, then Enter.

23. To the installation page, select Continue and then Enter Shih offline as I finished installing Ubuntu Server.

thank you : http://slayerbuu.blogspot.com/2010/11/ubuntu-1010-server.html
1. How to install ubuntu server 10.10 you must be connected to the internet for convenience update package for the following
2. Server on and insert CD ubuntu linux Server 10.10 on CD-ROM drive and Boot from CD. Display Logo and Language install


3. Select Install Ubuntu Server.
4. Select Language again.


5. Select the check keyboard. you select "No" and select format keyboard USA for convenience.


6. Configuration Network. If LAN connect Router Automatic.

If no DHCP Server or Network not connected to LAN as show. you select "Continue".

Select "Do not configure the network at this time".

7. Server your Host name. Enter you Host name.

8. This page is divided into partition management. Without the knowledge is recommended select Guided - use entire disk and setup LVM

9. Select Disk on Ubuntu Server

10. Confirm Disk Install.

11. This page asks. How many GB Harddisk space to put the finish on select Continue, then Enter.

12.This page is a detailed description of the LVM Partition that divided us and ask us how to write them? Disks, select Yes, then Enter.

13. Ubuntu will install the first part of the system, wait.

14. Admin User Setup Machine. This page, enter the full name of the administrator machine.
15. On this page, enter the username used to log input as you like and then select Continue and complete Enter.

16. This page, enter the password login enter as you like but I can remember. Finished, select Continue and then Enter.

17.Confirm Password. ter password again completed offline and then select Continue, then Enter.

18. Ubuntu on this page to ask us what we want to create a home directory or not. Advisable Yes, Enter.

19. Ubuntu will install the system on this page takes quite long.

20. This page asks. We want ubuntu to update itself or not.

21. This page will ask if we want to install anything to add based Server.

22. Ubuntu on this page, we will ask whether or not to install GRUB, choose Yes, then Enter.

23. To the installation page, select Continue and then Enter Shih offline as I finished installing Ubuntu Server.

thank you : http://slayerbuu.blogspot.com/2010/11/ubuntu-1010-server.html
ความคิดเห็น