
How to Install chillispot on Ubuntu 9.10

1. The first on step you need install ubuntu server 9.10
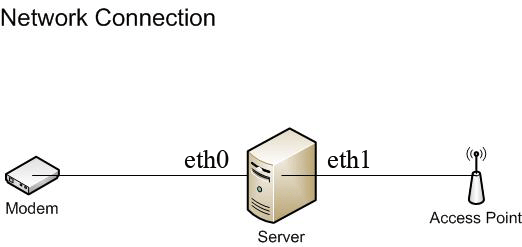
2. Config Modem or ADSL Router
- IP WAN Router on ISP
- IP Lan on 192.168.1.1
3. Config Ubuntu 9.10 server
- IP eth0 = 192.168.1.2
- IP eth1 do not set
4. Wifi Access Point
-Ethernet Connector from LAN (eth1 from server)
-DHCP server close
-Config AP not Key
Ready
5. Update & Upgrade Packet from Ubuntu
- sudo apt-get update
- sudo apt-get upgrade
6. Install OpenSSH Server with command
- sudo apt-get install ssh openssh-server
7. Install Chillispot
- sudo apt-get install chillispot
And Add detail
IP Address of redius server 1 :
127.0.0.1
Radius shared secret:
rediussecret
Ethernet interface for DHCP to listen:
eth1
URL of UAM Server :
https://192.168.182.1/cgi-bin/hotspotlogin.cgi
URL of UAM homepage :
https://192.168.182.1/welcome.html
Shared password between chillispot and webserver :
uamsecret
8. Enable captive portal in file chillispot
- sudo nano /etc/default/chilispot
config : Enable = 1
9.Edit the value of config chillispot
- sudo nano /etc/chillispot.conf
Edit value is follows
net 192.168.182.0/24
dns1 192.168.1.1
dns2 192.168.1.1
radiusserver1 127.0.0.1
radiusserver2 127.0.0.1
radiussecret radiussecret
dhcpif eth1
uamserver https://192.168.182.1/cgi-bin/hotspotlogin.cgi
uamhomepage https://192.168.182.1/welcome.html
uamsecret uamsecret
uamlisten 192.168.182.1
uamallowed www.google.com,192.168.182.0/24
10. Install Firewall
- sudo cp /usr/share/doc/chillispot/firewall.iptables /etc/init.d/chilli.iptables
- sudo chmod a+x /etc/init.d/chilli.iptables
- sudo ln -s /etc/init.d/chilli.iptables /etc/rcS.d/S41chilli.iptables
11. Edit config firewall
- sudo nano /etc/init.d/chilli.iptables
IPTABLES="/sbin/iptables"
EXTIF="eth1" #interface connect wifi access point
INTIF="eth0" #interface connect router adsl
$IPTABLES -P INPUT DROP
$IPTABLES -P FORWARD ACCEPT
$IPTABLES -P OUTPUT ACCEPT
#Allow related and established on all interface(input)
$IPTABLES -A INPUT -m state -state RELATED,ESTABLISHED -j ACCEPT
#Allow related,established and ssh on $EXTIF. Reject everything else.
$IPTABLES -A INPUT -i $EXTIF -p tcp -m tcp --dport 22 --syn -j ACCEPT
$IPTABLES -A INPUT -i $EXTIF -j REJECT
#Allow related and established from $INTIF. Drop everything else.
$IPTABLES -A INPUT -i $INTIF -j DROP
#Allow http and https on other interfaces (input).
#This is only needed if authentication server is on same server as chilli
$IPTABLES -A INPUT -p tcp -m tcp –dport 22 –syn -j ACCEPT # Allow client 192.168.182.0/24 ssh
to server Ubuntu (open for config and off later)
$IPTABLES -A INPUT -p tcp -m tcp –dport 80--syn -j ACCEPT
$IPTABLES -A INPUT -p tcp -m tcp –dport 443 --syn -j ACCEPT
#Allow everything on loopback interface.
$IPTABLES -A INPUT -i lo -j ACCEPT
# Drop everything to and from $INTIF (forward)
# This means that access points can only be managed from ChilliSpot
$IPTABLES -A FORWARD -i $INTIF -j DROP
$IPTABLES -A FORWARD -o $INTIF -j DROP
#Enable NAT on output device
$IPTABLES -t nat -A POSTROUTING -o $EXTIF -j MASQUERADE
#Allow ping to myserver
SERVER_IP="192.168.182.1"
/sbin/iptables -A INPUT -p icmp –icmp-type 8 -s 0/0 -d $SERVER_IP -m state –state
NEW,ESTABLISHED,RELATED -j ACCEPT
/sbin/iptables -A OUTPUT -p icmp –icmp-type 0 -s $SERVER_IP -d 0/0 -m state –state ESTABLISHED,RELATED -j ACCEPT
12. Install Apache2 and PHP5
- sudo apt-get install apache2
- sudo apt-get install php5
13. Install MySQL Server
- sudo apt-get install mysql-server
14. Install phpmyadmin
- sudo apt-get install phpmyadmin
15 To create a page for login.
- sudo mkdir –p /var/www/cgi-bin
- sudo zcat –c /usr/share/doc/chillispot/hotspotlogin.cgi.gz | tee /var/www/cgibin/
hotspotlogin.cgi
- chmod 755 /var/www/cgi-bin/hotspotlogin.cgi
16. Config page Login direct chillispot
- sudo nano /var/www/cgi-bin/hotspotlogin.cgi
$uamsecret=‖uamsecret‖;
$userpassword=1:
17. Make file welcome.html

18. Copy Logo Chillispot
- sudo wget http://mamboeasy.psu.ac.th/~wiboon.w/images/stories/chillispot/chillispot.png
cp chillispot.png /var/www
19. Use the apache ssl
- sudo mkdir /etc/apache2/ssl
- sudo make-ssl-cert /usr/share/ssl-cert/ssleay.cnf /etc/apache2/ssl/apache.pem
- sudo a2enmod ssl
20. Create Virturl Host name hotspot
- sudo nano /etc/apache2/sites-available/hotspot
NameVirtualHost 192.168.182.1:443
ServerAdmin webmaster@domain.org
DocumentRoot "/var/www"
ServerName "192.168.182.1"
Options Indexes FollowSymLinks MultiViews
AllowOverride None
Order allow,deny
allow from all
ScriptAlias /cgi-bin/ /var/www/cgi-bin/
AllowOverride None
Options ExecCGI -MultiViews +SymLinksIfOwnerMatch
Order allow,deny
Allow from all
ErrorLog /var/log/apache2/hotspot-error.log
LogLevel warn
CustomLog /var/log/apache2/hotspot-access.log combined
ServerSignature On
SSLEngine on
SSLCertificateFile /etc/apache2/ssl/apache.pem
21. Enable SSL virtual host
- a2ensite hotspot
22. Edit apache2 port
- sudo nano /etc/apache2/ports.conf
#NameVirtualHost *:80
#Listen 80
#
# SSL name based virtual hosts are not yet supported, therefore no
# NameVirtualHost statement here
# Listen 443
#
Listen 192.168.182.1:80
Listen 192.168.182.1:443
23. Config ServerName and Host
- sudo nano /etc/apache2/apache2.conf
ServerName 192.168.182.1
ServerRoot ―/etc/apache2′′
- sudo nano /etc/hosts
127.0.0.1 localhost
127.0.1.1 bigtree-ibm
192.168.182.1 bigtree-ibm #Add
24. Restart apache2
- /etc/init.d/apache2 restart
25. Install Freeradius 2.x.x
- apt-get install freeradius freeradius-mysql
26. Configuration Freeradius
- sudo nano /etc/freeradius/radiusd.conf
#remove mark # and config
modules {
....
$INCLUDE sql.conf
$INCLUDE sql/mysql/counter.conf
....
:wq! save config
- sudo nano /etc/freeradius/sql.conf
# Connection info:
server = "localhost"
login = "root"
password = "mysqlrootpassword" #password root mysql
# Database table configuration for everything except Oracle
radius_db = "radius"
:wq! save config
- sudo nano /etc/freeradius/clients.conf
client localhost {
...
secret=radiussecret #edit direct chillispot
...
:wq! save config
- sudo nano /etc/freeradius/sites-available/default
authorize {
...
#files
#Search files and add mark # first file
...
sql
#remove mark # mysql server
...
daily
# Add 3 Line
noresetcounter
dailycounter
monthlycounter
...
accounting {
...
sql
#remove mark #
...
session {
...
sql
...
:wq! save config
27. Install daloradius by Download from http://sourceforge.net/projects/daloradius/
or
http://www.ziddu.com/download/14514568/daloradius-0.9-8.tar.gz.html
- sudo tar zvfx daloradius-0.9-8.tar.gz
- sudo cp -R daloradius-0.9-8 /var/www
- sudo mv daloradius-0.9-8 dalo
28. Create database name radius and import structure daloradius
- mysql -u root -p
- Enter password:
Welcome to the MySQL monitor. Commands end with ; or \g.
Your MySQL connection id is 166
Server version: 5.1.37-1ubuntu5 (Ubuntu)
Type "help;" or "\h" for help. Type "\c" to clear the current input statement.
mysql> create database radius;
Query OK, 1 row affected (0.00 sec)
mysql> exit
Bye
29.import structure database from file /var/www/dalo/contrib/db/fr2-mysql-daloradius-and-freeradius.sql
- mysql -u root -p radius < /var/www/dalo/contrib/db/fr2-mysql-daloradius-and-freeradius.sql - Enter password: 30. Open Web Browser Add user - http://192.168.182.1/dalo/login.php - Username: administrator - Password: radius

- Press Apply Create user
31. Test of the radius authen
- freeradius -XXX
- radtest test test 127.0.0.1 0 radiussecret
Sending Access-Request of id 43 to 127.0.0.1 port 1812
User-Name = "test"
User-Password = "test"
NAS-IP-Address = 127.0.1.1
NAS-Port = 0
rad_recv: Access-Accept packet from host 127.0.0.1 port 1812, id=43, length=20
Success!!!
thank you for
http://www.google.co.th/url?sa=t&source=web&cd=4&ved=0CDIQFjAD&url=http%3A%2F%2Fwww.itmanage.info%2Ftechnology%2Flinux%2Fubuntu%2Fchillihospot%2Finstall_chillispot_on_ubuntu_910_pdf%2F%25E0%25B8%2581%25E0%25B8%25B2%25E0%25B8%25A3%25E0%25B8%2595%25E0%25B8%25B4%25E0%25B8%2594%25E0%25B8%2595%25E0%25B8%25B1%25E0%25B9%2589%25E0%25B8%2587%2520chillispot-%25E0%25B8%259A%25E0%25B8%2599-Ubuntu-9_10.pdf&rct=j&q=chillispot%20ubuntu%209.10&ei=xMaeTaWNG4jWrQeSvJjuAg&usg=AFQjCNFL6CKyQHhISv82pSBAGzyKRam15A&sig2=jWMmReAsZa4hZaBFaWjL3A&cad=rja
next page on click: File sharing on ubuntu
reverse on click : install ubuntu server 10.10
1. The first on step you need install ubuntu server 9.10
2. Config Modem or ADSL Router
- IP WAN Router on ISP
- IP Lan on 192.168.1.1
3. Config Ubuntu 9.10 server
- IP eth0 = 192.168.1.2
- IP eth1 do not set
4. Wifi Access Point
-Ethernet Connector from LAN (eth1 from server)
-DHCP server close
-Config AP not Key
Ready
5. Update & Upgrade Packet from Ubuntu
- sudo apt-get update
- sudo apt-get upgrade
6. Install OpenSSH Server with command
- sudo apt-get install ssh openssh-server
7. Install Chillispot
- sudo apt-get install chillispot
And Add detail
IP Address of redius server 1 :
127.0.0.1
Radius shared secret:
rediussecret
Ethernet interface for DHCP to listen:
eth1
URL of UAM Server :
https://192.168.182.1/cgi-bin/hotspotlogin.cgi
URL of UAM homepage :
https://192.168.182.1/welcome.html
Shared password between chillispot and webserver :
uamsecret
8. Enable captive portal in file chillispot
- sudo nano /etc/default/chilispot
config : Enable = 1
9.Edit the value of config chillispot
- sudo nano /etc/chillispot.conf
Edit value is follows
net 192.168.182.0/24
dns1 192.168.1.1
dns2 192.168.1.1
radiusserver1 127.0.0.1
radiusserver2 127.0.0.1
radiussecret radiussecret
dhcpif eth1
uamserver https://192.168.182.1/cgi-bin/hotspotlogin.cgi
uamhomepage https://192.168.182.1/welcome.html
uamsecret uamsecret
uamlisten 192.168.182.1
uamallowed www.google.com,192.168.182.0/24
10. Install Firewall
- sudo cp /usr/share/doc/chillispot/firewall.iptables /etc/init.d/chilli.iptables
- sudo chmod a+x /etc/init.d/chilli.iptables
- sudo ln -s /etc/init.d/chilli.iptables /etc/rcS.d/S41chilli.iptables
11. Edit config firewall
- sudo nano /etc/init.d/chilli.iptables
IPTABLES="/sbin/iptables"
EXTIF="eth1" #interface connect wifi access point
INTIF="eth0" #interface connect router adsl
$IPTABLES -P INPUT DROP
$IPTABLES -P FORWARD ACCEPT
$IPTABLES -P OUTPUT ACCEPT
#Allow related and established on all interface(input)
$IPTABLES -A INPUT -m state -state RELATED,ESTABLISHED -j ACCEPT
#Allow related,established and ssh on $EXTIF. Reject everything else.
$IPTABLES -A INPUT -i $EXTIF -p tcp -m tcp --dport 22 --syn -j ACCEPT
$IPTABLES -A INPUT -i $EXTIF -j REJECT
#Allow related and established from $INTIF. Drop everything else.
$IPTABLES -A INPUT -i $INTIF -j DROP
#Allow http and https on other interfaces (input).
#This is only needed if authentication server is on same server as chilli
$IPTABLES -A INPUT -p tcp -m tcp –dport 22 –syn -j ACCEPT # Allow client 192.168.182.0/24 ssh
to server Ubuntu (open for config and off later)
$IPTABLES -A INPUT -p tcp -m tcp –dport 80--syn -j ACCEPT
$IPTABLES -A INPUT -p tcp -m tcp –dport 443 --syn -j ACCEPT
#Allow everything on loopback interface.
$IPTABLES -A INPUT -i lo -j ACCEPT
# Drop everything to and from $INTIF (forward)
# This means that access points can only be managed from ChilliSpot
$IPTABLES -A FORWARD -i $INTIF -j DROP
$IPTABLES -A FORWARD -o $INTIF -j DROP
#Enable NAT on output device
$IPTABLES -t nat -A POSTROUTING -o $EXTIF -j MASQUERADE
#Allow ping to myserver
SERVER_IP="192.168.182.1"
/sbin/iptables -A INPUT -p icmp –icmp-type 8 -s 0/0 -d $SERVER_IP -m state –state
NEW,ESTABLISHED,RELATED -j ACCEPT
/sbin/iptables -A OUTPUT -p icmp –icmp-type 0 -s $SERVER_IP -d 0/0 -m state –state ESTABLISHED,RELATED -j ACCEPT
12. Install Apache2 and PHP5
- sudo apt-get install apache2
- sudo apt-get install php5
13. Install MySQL Server
- sudo apt-get install mysql-server
14. Install phpmyadmin
- sudo apt-get install phpmyadmin
15 To create a page for login.
- sudo mkdir –p /var/www/cgi-bin
- sudo zcat –c /usr/share/doc/chillispot/hotspotlogin.cgi.gz | tee /var/www/cgibin/
hotspotlogin.cgi
- chmod 755 /var/www/cgi-bin/hotspotlogin.cgi
16. Config page Login direct chillispot
- sudo nano /var/www/cgi-bin/hotspotlogin.cgi
$uamsecret=‖uamsecret‖;
$userpassword=1:
17. Make file welcome.html

18. Copy Logo Chillispot
- sudo wget http://mamboeasy.psu.ac.th/~wiboon.w/images/stories/chillispot/chillispot.png
cp chillispot.png /var/www
19. Use the apache ssl
- sudo mkdir /etc/apache2/ssl
- sudo make-ssl-cert /usr/share/ssl-cert/ssleay.cnf /etc/apache2/ssl/apache.pem
- sudo a2enmod ssl
20. Create Virturl Host name hotspot
- sudo nano /etc/apache2/sites-available/hotspot
NameVirtualHost 192.168.182.1:443
ServerAdmin webmaster@domain.org
DocumentRoot "/var/www"
ServerName "192.168.182.1"
Options Indexes FollowSymLinks MultiViews
AllowOverride None
Order allow,deny
allow from all
ScriptAlias /cgi-bin/ /var/www/cgi-bin/
AllowOverride None
Options ExecCGI -MultiViews +SymLinksIfOwnerMatch
Order allow,deny
Allow from all
ErrorLog /var/log/apache2/hotspot-error.log
LogLevel warn
CustomLog /var/log/apache2/hotspot-access.log combined
ServerSignature On
SSLEngine on
SSLCertificateFile /etc/apache2/ssl/apache.pem
21. Enable SSL virtual host
- a2ensite hotspot
22. Edit apache2 port
- sudo nano /etc/apache2/ports.conf
#NameVirtualHost *:80
#Listen 80
#
# SSL name based virtual hosts are not yet supported, therefore no
# NameVirtualHost statement here
# Listen 443
#
Listen 192.168.182.1:80
Listen 192.168.182.1:443
23. Config ServerName and Host
- sudo nano /etc/apache2/apache2.conf
ServerName 192.168.182.1
ServerRoot ―/etc/apache2′′
- sudo nano /etc/hosts
127.0.0.1 localhost
127.0.1.1 bigtree-ibm
192.168.182.1 bigtree-ibm #Add
24. Restart apache2
- /etc/init.d/apache2 restart
25. Install Freeradius 2.x.x
- apt-get install freeradius freeradius-mysql
26. Configuration Freeradius
- sudo nano /etc/freeradius/radiusd.conf
#remove mark # and config
modules {
....
$INCLUDE sql.conf
$INCLUDE sql/mysql/counter.conf
....
:wq! save config
- sudo nano /etc/freeradius/sql.conf
# Connection info:
server = "localhost"
login = "root"
password = "mysqlrootpassword" #password root mysql
# Database table configuration for everything except Oracle
radius_db = "radius"
:wq! save config
- sudo nano /etc/freeradius/clients.conf
client localhost {
...
secret=radiussecret #edit direct chillispot
...
:wq! save config
- sudo nano /etc/freeradius/sites-available/default
authorize {
...
#files
#Search files and add mark # first file
...
sql
#remove mark # mysql server
...
daily
# Add 3 Line
noresetcounter
dailycounter
monthlycounter
...
accounting {
...
sql
#remove mark #
...
session {
...
sql
...
:wq! save config
27. Install daloradius by Download from http://sourceforge.net/projects/daloradius/
or
http://www.ziddu.com/download/14514568/daloradius-0.9-8.tar.gz.html
- sudo tar zvfx daloradius-0.9-8.tar.gz
- sudo cp -R daloradius-0.9-8 /var/www
- sudo mv daloradius-0.9-8 dalo
28. Create database name radius and import structure daloradius
- mysql -u root -p
- Enter password:
Welcome to the MySQL monitor. Commands end with ; or \g.
Your MySQL connection id is 166
Server version: 5.1.37-1ubuntu5 (Ubuntu)
Type "help;" or "\h" for help. Type "\c" to clear the current input statement.
mysql> create database radius;
Query OK, 1 row affected (0.00 sec)
mysql> exit
Bye
29.import structure database from file /var/www/dalo/contrib/db/fr2-mysql-daloradius-and-freeradius.sql
- mysql -u root -p radius < /var/www/dalo/contrib/db/fr2-mysql-daloradius-and-freeradius.sql - Enter password: 30. Open Web Browser Add user - http://192.168.182.1/dalo/login.php - Username: administrator - Password: radius

- Press Apply Create user
31. Test of the radius authen
- freeradius -XXX
- radtest test test 127.0.0.1 0 radiussecret
Sending Access-Request of id 43 to 127.0.0.1 port 1812
User-Name = "test"
User-Password = "test"
NAS-IP-Address = 127.0.1.1
NAS-Port = 0
rad_recv: Access-Accept packet from host 127.0.0.1 port 1812, id=43, length=20
Success!!!
thank you for
http://www.google.co.th/url?sa=t&source=web&cd=4&ved=0CDIQFjAD&url=http%3A%2F%2Fwww.itmanage.info%2Ftechnology%2Flinux%2Fubuntu%2Fchillihospot%2Finstall_chillispot_on_ubuntu_910_pdf%2F%25E0%25B8%2581%25E0%25B8%25B2%25E0%25B8%25A3%25E0%25B8%2595%25E0%25B8%25B4%25E0%25B8%2594%25E0%25B8%2595%25E0%25B8%25B1%25E0%25B9%2589%25E0%25B8%2587%2520chillispot-%25E0%25B8%259A%25E0%25B8%2599-Ubuntu-9_10.pdf&rct=j&q=chillispot%20ubuntu%209.10&ei=xMaeTaWNG4jWrQeSvJjuAg&usg=AFQjCNFL6CKyQHhISv82pSBAGzyKRam15A&sig2=jWMmReAsZa4hZaBFaWjL3A&cad=rja
next page on click: File sharing on ubuntu
reverse on click : install ubuntu server 10.10
ความคิดเห็น