ข้ามไปที่เนื้อหาหลัก

Install CMS Drupal 7.x-dev system for ubuntu 10.10

Drupal is a web content management system, Open source. Developed by Mr. Dries Buytaet, Drupal software features within the architecture is flexible there are currently site of many famous hits as using Drupal, Debian Planet, Spread Firefox. Program written in PHP Developed in 2543 and is open source in 2544 rupal comes from a Dutch word "druppel" which means "drop of water".

CMS (Web Content Management System) is a web content management system Written in a programming language for web application In the content management of the site as easy to manage CMS Will include a program for creating web pages with the script Running on the server side. And database programs (MySQL).

Drupal program structure is different from other CMS Administrators do not have a separate user interface. However, user permissions are changed by the user's Drupal. Management system and the membership better. Flexible. And Drupal to display a model similar blog that is different from other CMS applications that have displayed a model news analysis.

Install Drupal

1. Create Drupal datebase.
Before installing drupal, we have to create the database and assign privileges to a user to connect to the database.Open phpMyAdmin to create database name drupal7x.


Permission to create and customize user database drupal.


2.Install Drupal
Installing Drupal system must be properties.
- Web Server (apache, IIS)
- PHP 5.x.x
- Database MySQL 5.x.x
System was introduced in Drupal Apache + PHP + MySQl
You can download the file by the command.

sudo wget http://ftp.drupal.org/files/projects/drupal-7.x-dev.tar.gz


To extract the file by command. You has Directory drupal-7.x-dev

sudo tar xzvf drupal-7.x-dev.tar.gz

Cut and rename it to the drupal-7.x-dev directory stored in /var/www by command.

sudo mv drupal-7.x-dev -r /var/www/drupal-7.x


3.Change Permission directory.
drupal install script file will assist in the installation should make changes to the operational mode of the file and the directory related Mode a + w by command.

sudo chmod a+w /var/www/drupal-7.x/sites/default


Create a folder named files into. /var/www/drupal-7.x/sites/default by command. And change Permission directory.

sudo mkdir /var/www/drupal-7.x/sites/default/files
sudo chmod a+w /var/www/drupal-7.x/sites/default/files


copy file default.settings.php and rename settings.php by command .

sudo cp /var/www/drupal-7.x/sites/default/default.settings.php /var/www/drupal-7.x/sites/default/settings.php


And change permission file mode by command.

sudo chmod a+w /var/www/drupal-7.x/sites/default/settings.php


Open Web Browser and insert value http://localhost/drupal-7.x/install.php Page show display "Drupal database setup" (localhost or ipaddress server/.


Select Standard and Save an Continue button


Show display language. You click Save and Continue Button.


Basic installation As Database type : mysql And select database name drupal65 insert username and password and click "Save and continue" Button.


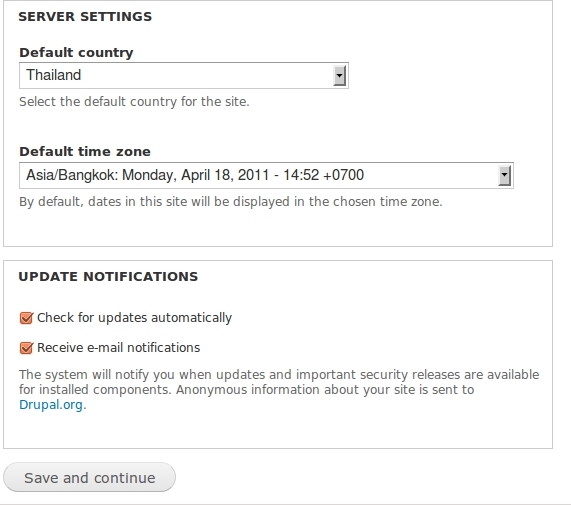
Setup input sitename, site Email, username, user email, and password and click Save and Continue Button


4.Change the permission back by command in terminal.
chmod go-w /var/www/drupal-7.x/sites/default
chmod go-w /var/www/drupal-7.x/sites/default/settings.php

5. Welcome Drupal 7


Reverse page on click : Use phpMyAdmin

ความคิดเห็น

โพสต์ยอดนิยมจากบล็อกนี้

ส่วนประกอบของเมนบอร์ด คอมพิวเตอร์ PC

ส่วนประกอบของเมนบอร์ด คอมพิวเตอร์ PC เมนบอร์ดเป็นแผงวงจรหลักที่สำคัญที่สุดของคอมพิวเตอร์ ดังนั้น จึงควรรู้จักตำแหน่งของอุปกรณ์ต่างบนเมนบอร์ดเสียก่อน จึงจะสามารถประกอบเครื่องคอมพิวเตอร์ได้ อุปกรณ์หลักที่สำคัญก็มีช็อกเกตสำหรับติดตั้งซีพียู, ช็อกเกตแรม และซิปเซตที่ทำหน้าที่ควบคุมอุปกรณ์ทั้งหมด หัวต่อและสล็อตสำหรับติดตั้งอุปกรณ์และการ์ดต่างๆ รวมไปถึงหัวต่อกับอุปกรณ์ภายนอกที่ต่อออกทางด้านหลังเครื่อง อุปกรณ์ที่ติดตั้งบนเมนบอร์ดได้แก่  1. ช็อกเกตซีพียู (CPU Socket) ช็อกเกตซีพียู เป็นตำแหน่งติดตั้งซีพียู โดยรูปแบบของช็อกเกตจะแตกต่างกันไปตามยี่ห้อและรุ่นของซีพียู การซื้อเมนบอร์ดจะต้องตรวจสอบว่าต้องการใช้กับซีพียูยี่ห้อใดและรุ่นไหน หากซื้อซีพียูที่มีช็อกเกตไม่ตรงกับเมนบอร์ดจะไม่สามารถใช้งานได้ ปัจจุบันจะมีช็อกเกตที่ใช้งานบนเมนบอร์ดคือ Intel LGA 775,  Intel LGA 1150, Intel LGA 1151, Intel LGA1155 และ Intel LGA 2066 ใช้สำหรับซีพียู Intel ทั้งหมด แต่ต้องดูด้วยว่า ซีพียู อินเทลใดใช้ช็อกเกตเท่าไหร่ ส่วน AMD AM4, AMD sTRX4 และ AMD TR4 จะใช้สำหรับ CPU AMD เท่านั้นซึ่งก็เหมือนกับอินเทล ซี

รวม Code Debug Card Mainboard

รวม Code Debug Card Mainboard สำหรับช่างซ่อมคอมมือใหม่ที่มีเครื่องมือ Debug Card เป็นตัวช่วยแล้ว บางครั้งอาจจะไม่รู้ว่าค่า Error Code นั้นคืออะไร ผมได้สืบหาข้อมูลและเขียนเพื่อเตือนความจำของตนเองไว้ เพราะไม่ค่อยได้ใช้ตัว Debug Card นี้เช่นกัน นานๆครั้งมาใช้นั้น ค่อนข้างที่จะค้นหาข้อมูลอย่างลำบากเช่นกัน ผมจึงได้รวบรวมข้อมูลมาจากเว็บที่หาข้อมูลได้ ขอขอบคุณเจ้าของข้อมูลด้วยครับ CODE : ความหมาย 00 : ไม่มีสัญญาณให้เช็ค CPU หรือลองหา CPU ตัวใหม่มาเปลี่ยนดูครับ 01 : CPU TEST รอบที่ 1 02 : CPU TEST รอบที่ 2 04 : TEST Memory รีเฟรช ของอุปกรณ์ ต่าง ๆ  05 : Key board controller อาจมีปัญหา 07 : BIOS battery อาจจะหมด 0B : TEST cmos checksum 0D : เช็ค VGA CARD Interface C0 : ทดสอบหน่วยความจำและ slot(ลองฉีด สเปรย์สารพัดพิษดูครับ) 0E : เช็คหน่วยความจำ VGA(ลองหาตัวใหม่มาเปลี่ยนดูครับ)  11 :อาจมีปัญหาที่ DMA controller 41 : ให้ตรวจสอบ FLOPPY Drive 42 : .ให้ตรวจสอบ HARD DISK 43 : ค้นหาและตรวจสอบ serial และ parallel port 45 : ให้เช็ค Mainboard ว่าเข้ากับ CPU ไ

พอร์ตเชื่อมต่อต่างๆบนเมนบอร์ด

พอร์ตเชื่อมต่อต่างๆบนเมนบอร์ด พอร์ตเชื่อมต่อแบบต่างๆ คือ หัวต่อที่ใช้เชื่อมต่อกับอุปกรณ์ภายนอก เช่น คีย์บอร์ด เมาส์ และเครื่องพิมพ์ สายแลน เป็นต้น ลักษณะของหัวต่อแต่ละแบบจะมีมาตรฐานและแตกต่างกันออกไปอยู่แล้ว จึงไม่ต้องกังวลว่าจะเสียบผิดรูปแบบ เพราะแต่ละหัวต่อจะมีรูปแบบไม่เหมือนกัน พอร์ตเชื่อมต่อต่างๆบนเมนบอร์ด มีดังนี้ 1. หัวต่อคีย์บอร์ดหรือเมาส์แบบ PS2 จะใช้คีย์บอร์ดก็ได้ หรือเมาส์ก็ได้ ปัจจุบันหัวต่อ PS2 ได้เลิกใช้งานไปแล้ว 2. หัวต่อ USB 2.0 ใช้สำหรับเชื่อมต่อ อุปกรณ์ต่างๆที่ใช้สาย USB ต่าง ความเร็วในการโอนถ่ายข้อมูล USB 2.0 นี้มีมากถึง 480 Mbps  3. หัวต่อจอภาพ แบบ Display port ใช้สำหรับเชื่อมต่อจอภาพที่เป็นประเภท Display port ส่งข้อมูลภาพได้สูง เหมาะสำหรับทำ Multi Display หรือการเชื่อมต่อหลายๆจอภาพ 4. หัวต่อจอภาพแบบ HDMI ปัจจุบัน (ปี 2020) เริ่มมีการใช้มากขึ้น เนื่องจากส่งข้อมูลความละเอียดภาพได้มากถึง 4K และอนาคตจะมีการพัฒนาเพิ่มขึ้นอีก 5. หัวต่อจอภาพแบบ DVI เป็นการพัฒนาการส่งออกจอภาพต่อจาก VGA เป็นช่วงเวลานึง ปัจจุบันจะไม่ค่อยมีใช้แล้ว 6. หัวต่อจอภาพแบบ VGA ใช